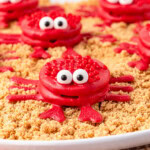
Red Candy Covered Oreos Recipe (Cute Crab Cookies)
It’s time to get a little creative in the kitchen! If you’re looking for fun and delicious treats that will impress friends and family, you’ve come to the right place.
Servings: 12 cookies
Calories: 120kcal
Ingredients
- 12 Golden Oreos
- 12 ounce package red candy melts/melting wafers
- Candy eyeballs
- Red sugar pearls or nonpareils
- Extra Golden Oreos for sand (optional)
Instructions
- Start by taking a sheet of parchment paper or wax paper, a pen or marker, and one Oreo cookie. Use the Oreo to trace circles about 3-4 inches apart. (Make sure to toss the cookie afterward if it gets ink on it.)
- Draw 8 crab legs and add 2 claws with the pen on the front two legs.
- Flip the parchment paper over and place it on a baking sheet.
- Place ½ cup of red candy wafers in a piping bag and twist it shut. Microwave on a low or defrost setting until melted and smooth, checking every 30 seconds to ensure even heating. Once melted, let it cool for 3-5 minutes until the bag is cool to the touch; this step is important to prevent spills while piping.
- Snip a small tip off the piping bag, trace the crab legs and claws on the prepared parchment paper, and then set aside.
- Melt the remaining red candy wafers in a microwave-safe glass bowl on a low or defrost setting, stirring and checking every 30 seconds until smooth.
- Take a fork and place an Oreo cookie on top. Dip it completely into the melted red candy and lift it out, tapping the fork against the bowl’s edge to remove excess coating.
- Transfer the dipped Oreo directly onto the piped crab legs, working in small batches for easier handling.
- Sprinkle the coated Oreos with sprinkles, leaving space at the front for the eyes.
- Add the eyeballs toward the front near the claws. You can position them standing on the side or lay them flat. If standing, use some sprinkles behind them for support while they set.
- Let the coating set completely before serving. To speed up the process, refrigerate for 15-30 minutes.
- Bonus step: If you have leftover uncoated Golden Oreos, blend them in a blender or pulse in a food processor to make edible sand! Consider removing the cream filling from at least half of the Oreos for a less wet texture.
Notes
- Use Quality Ingredients: Choosing high-quality candy melts can significantly enhance your cookies' taste and shiny finish.
- Work in Small Batches: When dipping the Oreos, work in small batches to prevent the candy coating from setting before you can sprinkle or decorate them.
- Practice Patience: Allow the melted candy melts to cool before piping to avoid spills and ensure neat designs.
- Make it a Family Activity: Have the children decorate the cookies for a fun family project that enhances creativity and teamwork.
- Try Different Themes: Change the candy melts and colorful sprinkles to match the occasion and use different colors for various holidays or celebrations.
- Test Your Melting Method: If you're using the microwave to melt candy, experiment with the power levels and times to find what works best with your equipment for the perfect smooth finish.
- Create Unique Shapes: Use different cookie cutter shapes or add additional toppings to give each batch its own distinctive flair.
Nutrition
Calories: 120kcal | Carbohydrates: 16g | Protein: 1g | Fat: 6g | Saturated Fat: 3g | Polyunsaturated Fat: 1g | Monounsaturated Fat: 1g | Sodium: 59mg | Potassium: 11mg | Fiber: 0.2g | Sugar: 12g | Calcium: 3mg | Iron: 0.3mg