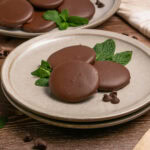
Thin Mint Cookies (Girl Scout Copycat)
These copycat thin mint cookies are crispy, chocolatey, and packed with cool mint flavor so everything you love about the original, made right in your own kitchen.
Servings: 24 cookies
Calories: 172kcal
Ingredients
For the cookies:
- 1 cup unsalted butter softened
- 1 cup sugar
- 1 egg
- 1 teaspoon vanilla
- ½ teaspoon mint extract or ¼ teaspoon peppermint
- 2 cups flour
- ½ cup cocoa powder
- 1 teaspoon baking powder
- ½ teaspoon salt
For the coating:
- 10 oz dark chocolate melting wafers
- ½ teaspoon mint extract or ¼ teaspoon peppermint
Instructions
- Preheat your oven to 350°F and line two baking sheets with parchment paper. Set aside. In the bowl of a stand mixer, beat the softened butter and sugar together until smooth and creamy. Scrape down the sides of the bowl as needed.
- Add the egg, vanilla, and mint extract to the butter mixture. Mix well, making sure everything is fully combined.
- Add in the flour, cocoa powder, baking powder, and salt. Mix thoroughly until a thick dough forms. Switch to the paddle attachment if needed, and scrape down the sides as you go.
- Lightly flour your work surface and roll the dough out to about ¼ to 3/16 of an inch thick. Use a 1.5 or 2-inch round cookie cutter to cut out as many rounds as possible. Gather the scraps, re-roll the dough, and cut out more cookies until all the dough is used. Place the cookie rounds on the prepared baking sheets.
- Chill the cut-out cookies in the freezer for about 10 minutes just before baking. This helps them hold their shape. Bake for 10 to 12 minutes, or until the centers are set. Allow the cookies to cool completely on the baking sheet before moving on to the coating step.
- Once all the cookies are baked and fully cooled, make the chocolate coating. In a medium bowl, combine the dark chocolate melting wafers with the mint extract. Heat in the microwave in 30-second increments, stirring between each, until completely melted and smooth.
- Using a fork, dip each cookie into the melted chocolate mixture. Coat thoroughly, tap the fork against the side of the bowl to let the excess drip off, then place the dipped cookie back on the parchment to set.
- Once all cookies have been dipped, transfer them to the fridge or freezer to set the chocolate more quickly.
Notes
- Chill your cut-out cookies before baking. That 10-minute freezer chill keeps the edges sharp and stops the cookies from spreading. Don't skip this step.
- Roll evenly. An even dough thickness means all your cookies bake at the same rate. Use rolling pin guides or rubber bands around the ends of your pin if needed.
- Let cookies cool completely before dipping. If the cookies are even slightly warm, the chocolate coating can seize up and look messy.
- Use a fork for dipping. A fork lets the excess chocolate fall through cleanly, giving you a neater finish than tongs or a spoon.
- Work quickly with the chocolate. Once it starts cooling it thickens, so dip your cookies in batches and reheat the chocolate in 10-15 second bursts if needed.
- Stir often when melting chocolate. Chocolate can scorch quickly in the microwave, so short increments and regular stirring is the way to go.
Nutrition
Calories: 172kcal | Carbohydrates: 21g | Protein: 2g | Fat: 10g | Saturated Fat: 6g | Polyunsaturated Fat: 0.4g | Monounsaturated Fat: 2g | Trans Fat: 0.3g | Cholesterol: 27mg | Sodium: 76mg | Potassium: 44mg | Fiber: 1g | Sugar: 12g | Vitamin A: 246IU | Vitamin D: 0.2µg | Calcium: 17mg | Iron: 1mg