
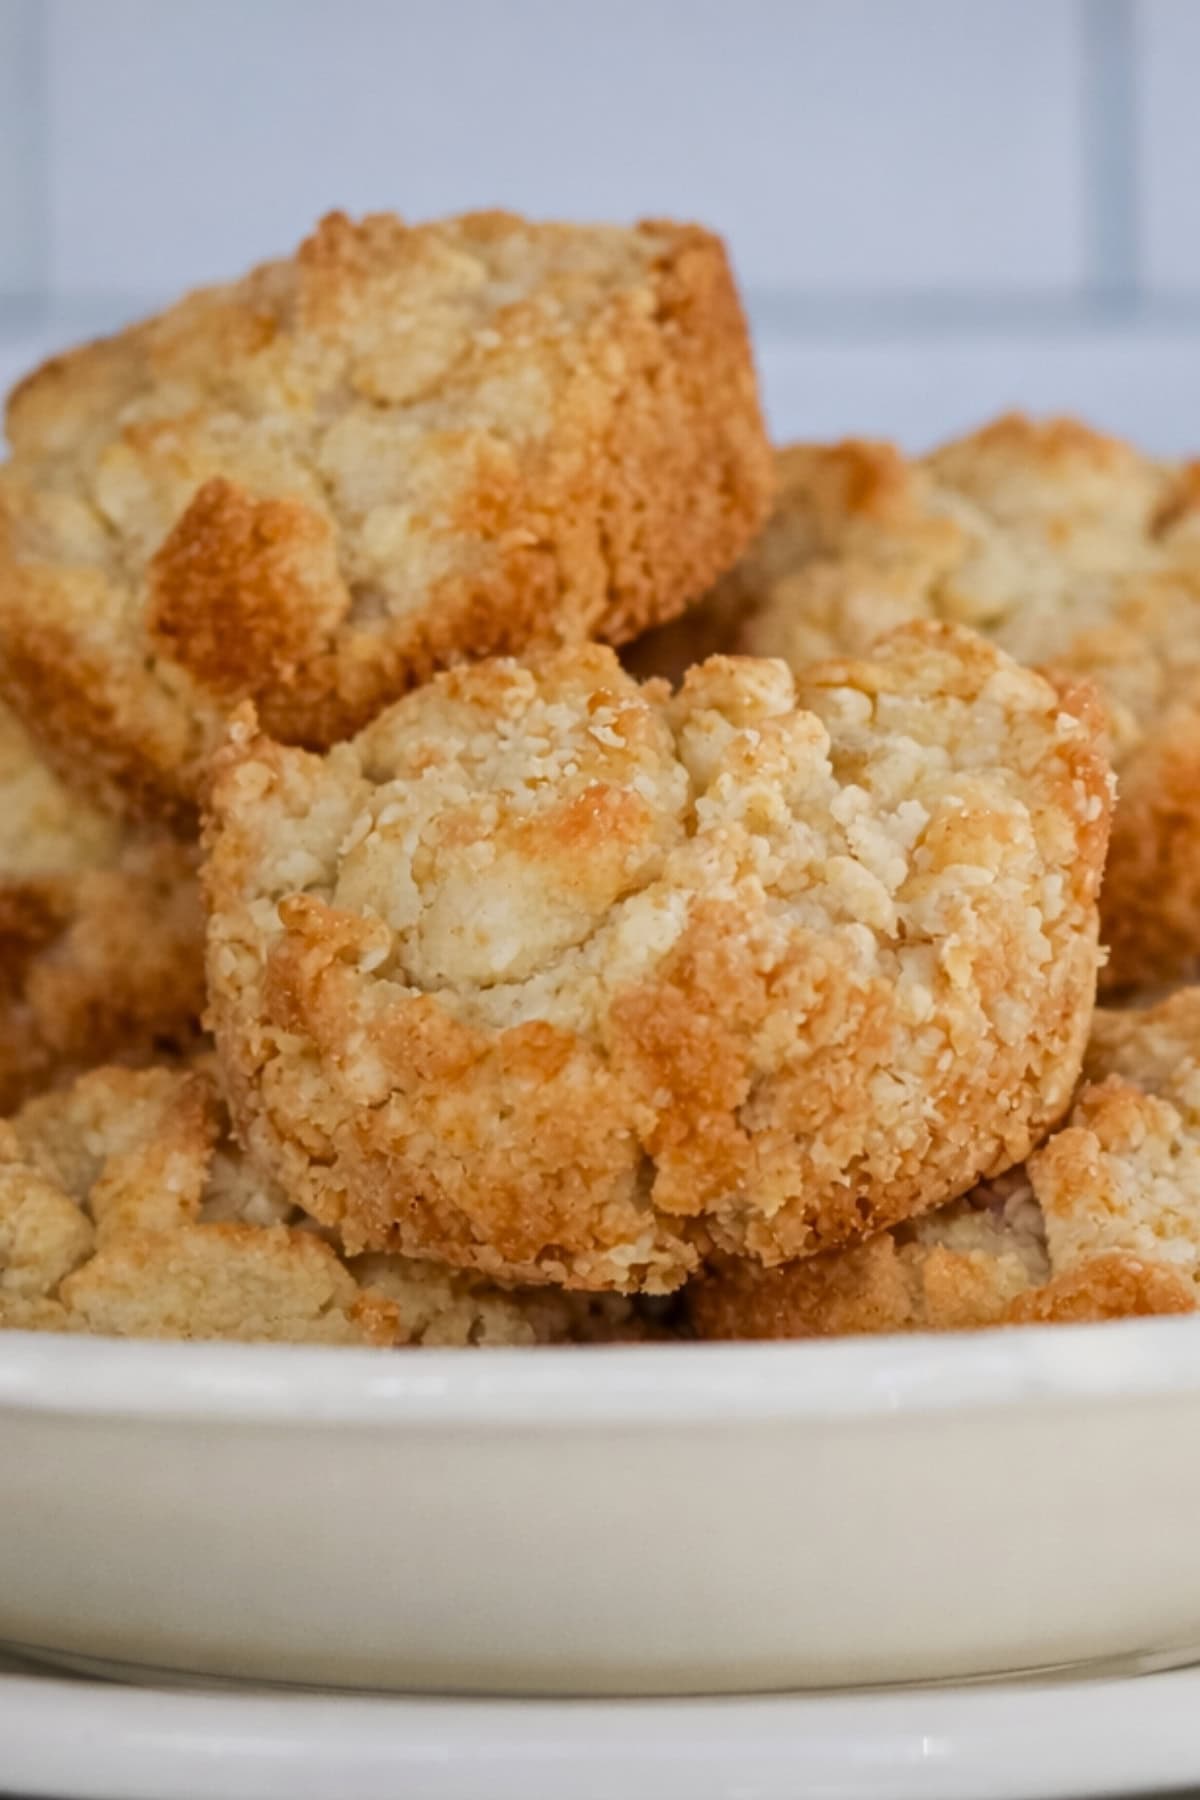
Sour Cream Biscuits (3 Ingredients!)


Sour cream biscuits made with just 3 ingredients are the kind of recipe you’ll keep coming back to. Ready in about 25 minutes from start to finish, all you need is self-rising flour, sour cream, and butter, no mixer, no rolling pin, and no fuss.

Save This Post!
These easy homemade biscuits come out fluffy and buttery every time, whether you’re serving them alongside dinner or splitting them open for a breakfast sandwich. If you love simple self-rising flour biscuits that actually deliver, this one’s going to be a regular in your kitchen.
Also, check out my cheddar biscuits with green chiles, or even this olive oil bread with rosemary.
Why you’ll love these 3 Ingredient biscuits
- Only 3 ingredients: You don’t need a long shopping list or a pantry full of specialty items to make these sour cream biscuits. Self-rising flour, sour cream, and butter are likely already in your kitchen, which makes this one of those recipes you can pull off any night of the week.
- Ready in about 25 minutes: From mixing bowl to muffin tin to table, these biscuits come together fast. That includes bake time, so if you need a quick bread side or a last-minute breakfast addition, these have you covered.
- No special tools or skills needed: There’s no rolling pin, no biscuit cutter, and no kneading involved. You just mix, spoon into a muffin tin, and bake. It’s a genuinely fail-proof process that even first-time bakers can nail.
- Works for breakfast or dinner: These biscuits are flexible enough to pull double duty. Slather them with butter and jam in the morning, pile them high with gravy at brunch, or serve them as a side with a hearty soup or roast at dinner.
Ingredients for sour cream biscuits
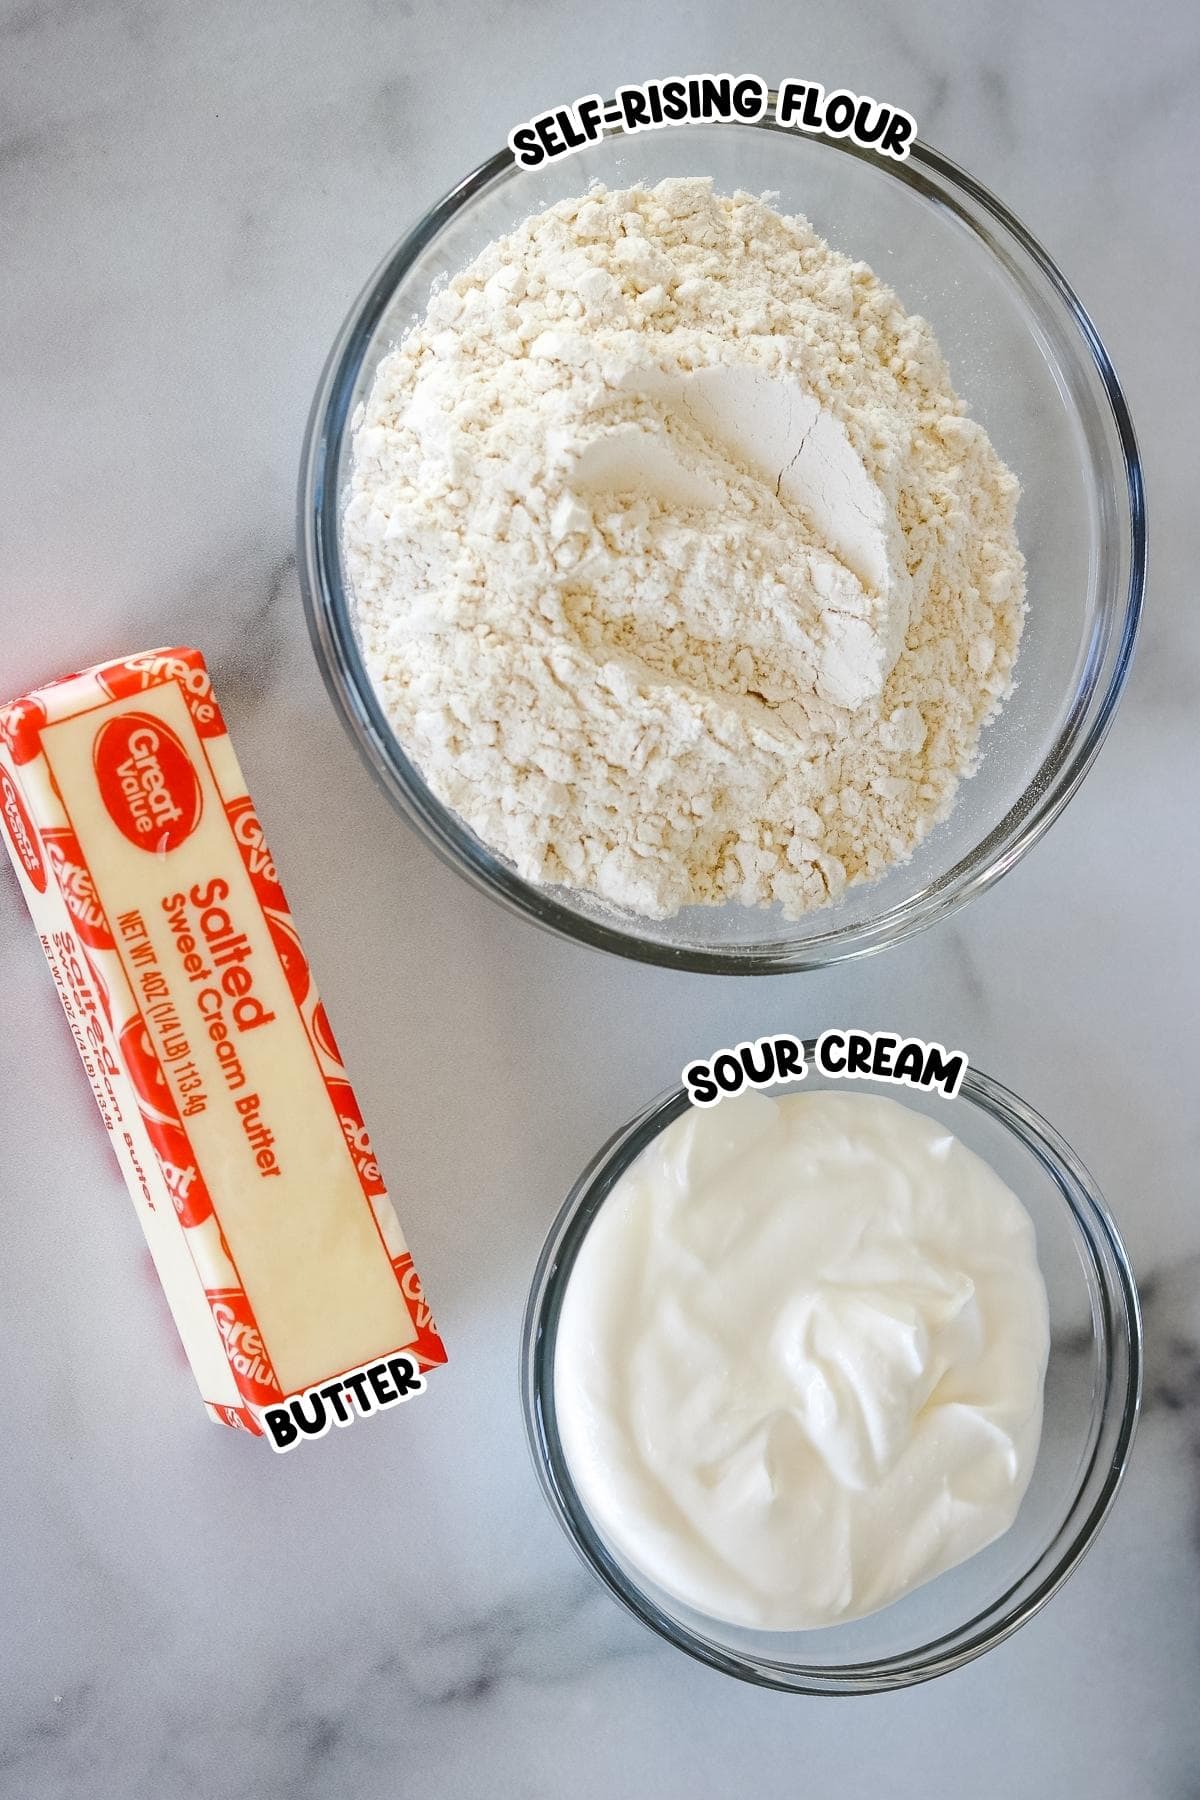
- Sour Cream – You will want to use a full fat sour cream for this recipe.
- Self Rising Flour – Make sure it is self rising and not all purpose flour.
- Butter – Use real butter for this recipe, not margarine.
Substitutions and Additions
- Greek yogurt — Full-fat Greek yogurt works as a straight swap for sour cream if that’s what you have on hand. It gives the biscuits a slightly tangier flavor but keeps the same soft, fluffy texture.
- Salted vs. unsalted butter — Either works here. Salted butter adds a little extra flavor, which is why it’s the preferred choice for this recipe, but unsalted is perfectly fine too.
- Cheddar cheese — Stir in a handful of shredded cheddar to the dough for a savory, cheesy twist. About half a cup mixed in before spooning into the muffin tin does the trick.
- Fresh herbs — Chives, rosemary, or thyme can be mixed into the dough to add a little something extra. A tablespoon of finely chopped fresh herbs goes a long way.
- All-purpose flour — If you don’t have self-rising flour, combine 1 cup all-purpose flour with 1½ teaspoons of baking powder and ¼ teaspoon salt as a substitute.
- Flaky sea salt — A pinch sprinkled over the tops of the biscuits just before baking adds a nice finishing touch and a little extra flavor.
How To Make Sour Cream Biscuits
The complete list of ingredients, quantities, and instructions can be found in the printable recipe card below.

- Step One: Preheat the oven and prep your muffin tin. I just sprayed with cooking spray.
- Step Two: Add your softened butter into the self rising flour. Use a fork and mix to create coarse crumbs. (Photos 1 & 2)
- Step Three: Next, you will stir in the sour cream and mix until combined. It will be a crumble type of dough. (Photos 3 & 4)

- Step Four: Spoon into your muffin tin. I did 6-8 muffins. (Photo 5)
- Step Five: Bake as directed, then serve warm. (Photo 6)

How to Store
Refrigerate – I like to refrigerate any of the biscuits we don’t eat right away. With the sour cream used in the biscuits, I find it stores best in an airtight container in the fridge. These biscuits will store for up to 2-3 days. They are best fresh, as they do dry out.
Reheating – So if you want, go ahead and wrap the biscuits tightly in foil and then warm up in the oven at 325 degrees for 5 minutes or so. Or you can warm up the biscuits in the microwave. This will help add moisture back into the biscuit, and it won’t be a dry biscuit when you bite into it.
Freezer – Go ahead and freeze your biscuits in a freezer container or airtight container. These will freeze for 2-3 months. Thaw in the fridge overnight or warm it up straight from frosting.
Recipe Tips
- Use full-fat sour cream for the best results — lower-fat versions have more water content, which can affect the texture of the biscuits.
- Don’t overmix the dough. Stir just until the ingredients come together into a crumbly, rough dough. Overworking it develops the gluten and can make the biscuits tough.
- Make sure your self-rising flour is fresh. The baking powder in self-rising flour loses potency over time, and old flour is one of the most common reasons biscuits don’t rise properly.
- Grease your muffin tin well before adding the dough. A light coat of butter or cooking spray helps the biscuits release cleanly after baking.
- Serve them warm straight from the oven for the best texture. They do dry out a little as they cool, so if you’re reheating, wrap them in foil and warm in the oven at 325°F for about 5 minutes.
Serving Suggestions
These sour cream biscuits are delicious on their own, but they really shine as part of a bigger meal. Try serving them alongside a slow-cooked Crockpot Pot Roast, they’re perfect for soaking up all that rich gravy. For a cozy weeknight dinner, pair them with a bowl of Crockpot Sausage Potato Soup for something seriously warming and satisfying.
For a breakfast spread, slice your biscuits in half and layer them with Sheet Pan Scrambled Eggs for an easy, crowd-friendly breakfast sandwich. And if you love a good homemade biscuit, the Cheddar Biscuits with Chilies and the Homemade Bisquick Biscuit Recipe are both worth adding to your baking rotation.

Recipe FAQs
Regular biscuits typically rely on buttermilk or plain milk to provide moisture and a little tang. Sour cream biscuits use — you guessed it — sour cream, which gives them a noticeably tender crumb and a slightly richer flavor. The fat content in full-fat sour cream also helps create that soft, fluffy texture without needing a lot of extra steps.
Yes, you can substitute Bisquick for the self-rising flour in a pinch. Because Bisquick already contains fat and leavening, you may want to reduce the butter slightly or leave it out altogether and adjust from there. The texture will be a little different, but they’ll still bake up soft and tasty.
Biscuits in general are a staple of Southern cooking, and sour cream biscuits fit right into that tradition. The use of sour cream instead of buttermilk is a natural variation that keeps the same spirit — tender, fluffy, and buttery — while making the recipe even simpler. If you grew up eating biscuits at your grandmother’s table, these will feel very familiar.
The most common culprit is old self-rising flour. Self-rising flour contains baking powder, which loses its effectiveness over time — so if yours has been sitting in the pantry for a while, that could be the issue. Also, make sure you’re using self-rising flour and not all-purpose flour, as all-purpose flour won’t give the biscuits any lift on its own.
Absolutely. For every 1 cup of self-rising flour called for, combine 1 cup of all-purpose flour with 1½ teaspoons of baking powder and ¼ teaspoon of salt. Whisk it together before using, and your sour cream biscuits should turn out just as fluffy.


Sour Cream Biscuits
Equipment
- Mixing Bowl Large
Ingredients
- 1 cup self-rising flour
- 1 stick butter softened
- ½ cup sour cream
Instructions
- Preheat oven to 400℉ degrees.
- Cut softened butter into self-rising flour until mixture resembles coarse crumbs.
- Stir in sour cream until combined. The mixture will still be a little crumbly.
- Spoon mixture into 6 – 8 muffin greased tins.
- Bake for 20 minutes or until golden.
Notes
- Use full-fat sour cream for the best results — lower-fat versions have more water content, which can affect the texture of the biscuits.
- Don’t overmix the dough. Stir just until the ingredients come together into a crumbly, rough dough. Overworking it develops the gluten and can make the biscuits tough.
- Make sure your self-rising flour is fresh. The baking powder in self-rising flour loses potency over time, and old flour is one of the most common reasons biscuits don’t rise properly.
- Grease your muffin tin well before adding the dough. A light coat of butter or cooking spray helps the biscuits release cleanly after baking.
- Serve them warm straight from the oven for the best texture. They do dry out a little as they cool, so if you’re reheating, wrap them in foil and warm in the oven at 325°F for about 5 minutes.
Nutrition Information
Hungry for more?
Follow me on Pinterest and make sure to comment below!


Hi Kim,
What an Yummy share.
Looks so delicious. Thanks for sharing it well to prepare easy.
I think for sour it’s best to use yogurt.
Keep sharing. I landed here via the tweet of David Leonhardt.
Keep sharing.
Best Regards from Philipscom Secunderabad, India