
Bacon Butterfinger Cheesecake with Peanut Butter

This butterfinger cheesecake combines the irresistible crunch of Butterfinger candy bars with the unexpected savory touch of candied bacon for an unforgettable dessert experience. Ready in about 3 hours (plus chilling time), this decadent treat features a chocolate Oreo crust, creamy peanut butter cheesecake filling, and a rich chocolate ganache topping.

Save This Post!
The combination of sweet Butterfinger candy and candied bacon creates an amazing sweet-and-salty flavor profile that takes this Butterfinger cheesecake recipe to the next level. With its creamy texture and layers of indulgent flavors, this cheesecake is guaranteed to impress at any gathering or special occasion.
Looking for more decadent desserts? Try my Pull Apart Pepperoni & Mozzarella Pizza Monkey Bread for a savory treat, or my Grinch Popcorn Recipe for another sweet and fun option. If you love chocolate, don’t miss my Easy Christmas Pretzels Dipped in Chocolate for a simpler dessert that’s still impressive!
Reasons You’ll Love This Recipe
- Perfect Texture Contrast: The crunchy Butterfinger candy bars and crispy candied bacon pair beautifully with the smooth, creamy cheesecake filling, creating an exciting mix of textures in every bite.
- Sweet and Salty Harmony: The combination of sweet Butterfinger candy with salty, caramelized bacon creates a flavor profile that satisfies all your cravings at once, making this dessert truly addictive.
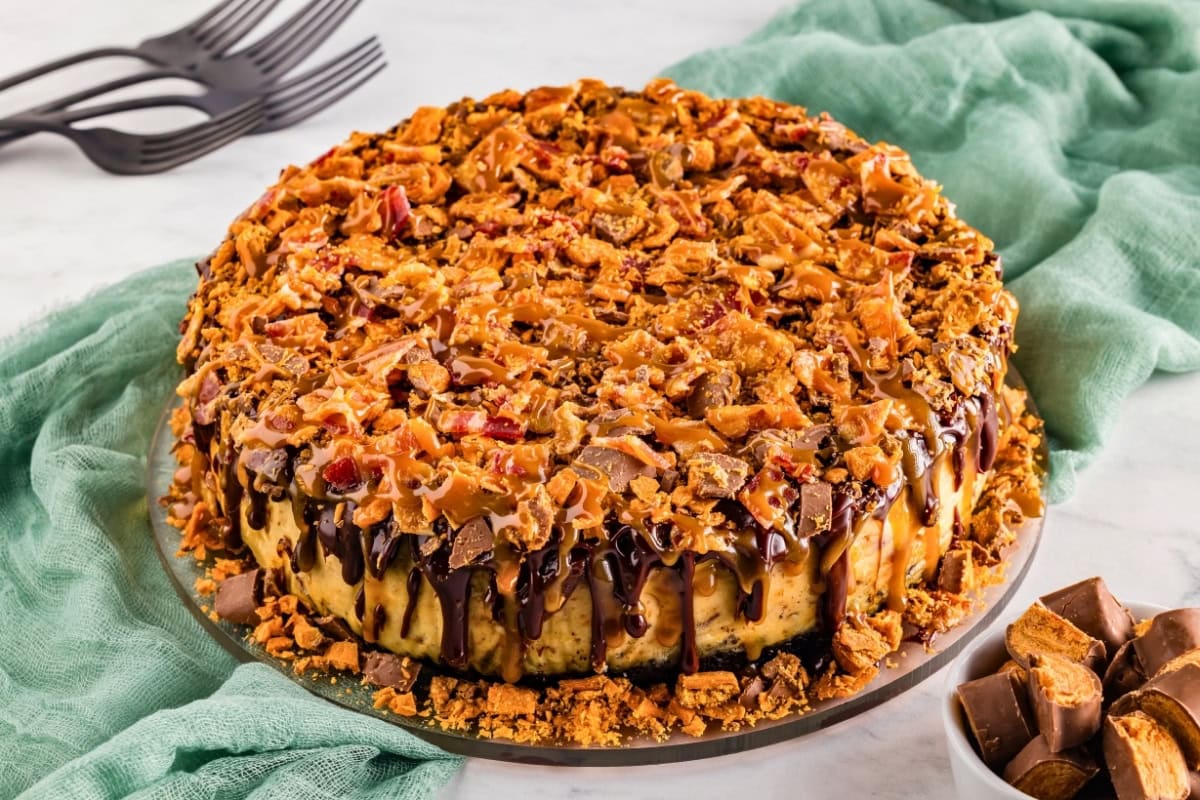
- Show-Stopping Presentation: With its glossy chocolate ganache topping, sprinkled with Butterfinger pieces, candied bacon, and drizzled caramel, this cheesecake makes a stunning centerpiece for any dessert table.
- Make-Ahead Convenience: This cheesecake actually improves with time, making it perfect for entertaining. Prepare it the day before your event, and it’ll be at its best when you’re ready to serve.

What Is Butterfinger Cheesecake?
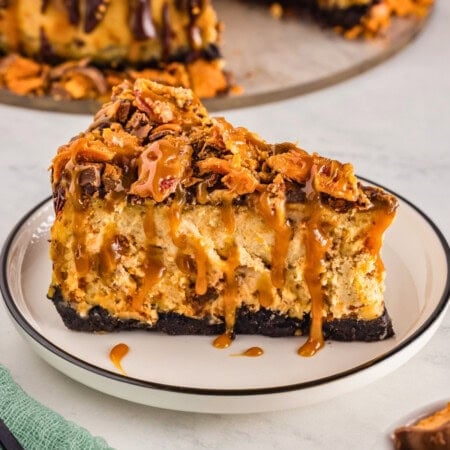
Butterfinger cheesecake is a decadent dessert that transforms the popular Butterfinger candy bar into a creamy, indulgent cheesecake experience. The traditional version features a chocolate cookie crust, a rich cheesecake filling studded with chopped Butterfingers, and often a chocolate or caramel topping.
This bacon Butterfinger cheesecake takes the concept even further by adding candied bacon to the mix, creating a sweet-and-savory dimension that elevates the dessert to new heights. The peanut butter in the filling complements the Butterfinger candy perfectly, as Butterfingers themselves have a distinctive peanut butter flavor at their core.
Bacon Butterfinger Cheesecake Ingredients
See the recipe card below for the full list of ingredients and exact measurements.
- Oreo cookies – For the chocolate cookie crust, providing a rich chocolate base that complements the peanut butter and Butterfinger flavors in the filling.
- Unsalted butter – Melted butter helps bind the cookie crumbs together to form a sturdy crust that holds up to the creamy filling.
- Cream cheese – The foundation of any great cheesecake, use full-fat cream cheese for the creamiest, most indulgent texture and flavor.
- Light brown sugar – Adds a subtle molasses flavor that enhances the Butterfinger candy and complements the candied bacon.
- Granulated sugar – Provides sweetness and helps create the perfect cheesecake texture.
- Creamy peanut butter – Adds rich peanut butter flavor that pairs perfectly with the Butterfinger candy bars in the filling.
- Heavy whipping cream – Creates a smooth, velvety texture in the cheesecake filling and is also used to make the ganache topping.
- Vanilla extract – Enhances all the flavors in the cheesecake with its warm, aromatic notes.
- Eggs – Provide structure to the cheesecake while maintaining that signature creamy texture.
- Butterfingers – Chopped Butterfinger candy bars add crunch, sweetness, and that iconic peanut butter-toffee flavor throughout the cheesecake.
- Candied bacon – Bacon cooked with brown sugar creates an irresistible sweet-savory element that makes this cheesecake truly unique.
- Semi-sweet chocolate chips – Forms the base of the ganache topping, adding a rich chocolate layer to complement the peanut butter flavors.
- Caramel sauce – Drizzled over the top for a finishing touch that ties all the flavors together beautifully.

Substitutions and Additions
- Cookie crust options – Graham cracker crust or Nutter Butter cookie crust can be used instead of Oreos for different flavor profiles.
- Chocolate options – Milk chocolate or dark chocolate chips can replace semi-sweet chocolate in the ganache for a different chocolate intensity.
- Nut butter alternatives – Almond butter or cookie butter can be substituted for peanut butter if you have allergies.
- Candy variations – Try using other candy bars like Snickers, Reese’s Cups, or Heath bars in place of some or all of the Butterfingers.
- Gluten-free option – Use gluten-free Oreos and ensure your Butterfinger candy is gluten-free (original Butterfingers are) for a gluten-free dessert.
- Caramel options – Homemade caramel sauce can replace store-bought for an extra special touch, or try chocolate syrup instead.
How to Make Bacon Butterfinger Cheesecake (step-by-step directions)

STEP 1. Preheat your oven to 325°F and position the rack in the lower third of the oven. Tightly wrap the outside of a 9-inch springform pan with aluminum foil, then line the bottom with parchment paper and grease the sides.
STEP 2. For the crust, crush Oreo cookies into fine crumbs using a food processor, then mix with melted butter. Press this mixture into the bottom and about an inch up the sides of the prepared pan. Bake for 8 minutes, then set aside to cool. (Photos 1 & 2)
STEP 3. To make the filling, beat cream cheese, brown sugar, granulated sugar, and peanut butter until creamy, using a mixer with the paddle attachment on low speed to avoid incorporating too much air. (Photo 3)
STEP 4. Add eggs one at a time, beating just until combined after each addition – don’t overmix! (Photo 4)
STEP 5. Stir in heavy whipping cream, vanilla extract, chopped Butterfingers, and chopped candied bacon. (Photo 5)

STEP 6. Pour the cheesecake batter into the prepared crust.
STEP 7. Create a water bath by placing the foil-wrapped springform pan in a larger roasting pan. Add hot water to the roasting pan until it reaches about halfway up the sides of the springform pan.
STEP 8. Bake for 1 hour and 15 minutes. The cheesecake should be set around the edges but still slightly jiggly in the center.
STEP 9. Turn off the oven and leave the cheesecake inside for 30 minutes.
STEP 10. Crack open the oven door and leave the cheesecake for another 30 minutes to cool gradually.
STEP 11. Remove the cheesecake from the oven, water bath, and foil wrap. Allow it to cool for 5-10 minutes on a cooling rack.
STEP 12. Refrigerate the cheesecake until firm, at least 5 hours or preferably overnight.
STEP 13. Once chilled, remove the cheesecake from the springform pan and place on a serving plate.
STEP 14. For the ganache, place semi-sweet chocolate chips and peanut butter in a bowl. Heat heavy cream until simmering, then pour over the chocolate and peanut butter. Whisk slowly until smooth and let cool for 5-10 minutes.
STEP 15. Pour the ganache over the top of the chilled cheesecake.
STEP 16. Garnish with additional chopped Butterfingers, candied bacon pieces, and a drizzle of caramel sauce. (Photo 6)
Recipe Tips
- Room temperature ingredients – Bring cream cheese and eggs to room temperature before mixing for the smoothest cheesecake batter without lumps.
- Low speed mixing – Use low speed when mixing the cheesecake batter to prevent incorporating too much air, which can cause cracks during baking.
- Proper water bath – Ensure the aluminum foil is tightly wrapped around the springform pan to prevent water from seeping in and making the crust soggy.
- Cooling gradually – The slow cooling process (turning off the oven, then cracking it open) helps prevent the cheesecake from cracking as it cools.
- Chilling time – Don’t rush the refrigeration time – overnight chilling allows the flavors to meld and the texture to set perfectly.
- Clean slicing – Run a sharp knife under hot water and wipe clean between each slice for the cleanest presentation.
Storing Tips
- Storage: This Butterfinger cheesecake keeps beautifully in the refrigerator, making it perfect for make-ahead dessert planning.
- Refrigerator: Cover the cheesecake loosely with plastic wrap or store in an airtight container in the refrigerator for 4-5 days. The flavor actually improves after the first day as the flavors meld together.
- Freezing: You can freeze the whole cheesecake or individual slices for up to 3 months. Wrap tightly in at least two layers of plastic wrap, then a layer of aluminum foil. Thaw overnight in the refrigerator before serving.
- Garnishing: If freezing, add the final garnishes of additional Butterfinger pieces, candied bacon, and caramel drizzle after thawing for the freshest presentation.
Serving Suggestions
This Bacon Butterfinger Cheesecake makes an incredible standalone dessert, but you can elevate the serving experience by pairing it with some complementary items. Serve slices alongside a scoop of vanilla ice cream or a dollop of Fresh Watermelon Bites With Whipped Feta for a refreshing contrast to the rich cheesecake.
Coffee or espresso makes an excellent beverage pairing with this decadent dessert. For a special occasion, consider serving with my Boozy Scooby Snack Drink Recipe for adults or a glass of cold milk for the kids.

Recipe FAQs
The water bath provides gentle, even heat around the cheesecake, which helps it bake slowly and evenly. This prevents cracks, creates a creamier texture, and helps the cheesecake rise properly without sinking in the middle after cooling.
Yes, you can certainly omit the candied bacon if preferred. The cheesecake will still have the delicious Butterfinger and peanut butter flavors, though you’ll miss out on the sweet-savory contrast that makes this version special.
For the best texture, place Butterfinger candy bars in a sealed plastic bag and use a rolling pin to crush them, or pulse them briefly in a food processor. You want a mixture of sizes – some small crumbs and some larger pieces – for the best texture contrast.
Yes, pre-crushed Oreo crumbs work perfectly for the crust and save time. Just be sure they’re fine enough to hold together when mixed with the melted butter.
Cheesecakes typically crack from overmixing (which incorporates too much air), baking at too high a temperature, or cooling too quickly. Use the paddle attachment on low speed, bake with a water bath, and follow the gradual cooling instructions to prevent cracks. If your cheesecake does crack, don’t worry – the ganache topping will cover it beautifully!
Need More Dessert Recipes? Try These:
Bacon Butterfinger Cheesecake with Peanut Butter
Equipment
- Springform Pan 9-Inch
Ingredients
Crust
- 2 ¼ c Oreo Crumbs or 20-25 Oreo Cookies. You can use Gluten Free Oreos for Gluten Free Option
- 4 Tbsp Unsalted Butter Melted
Filling
- 4- 8 oz Cream Cheese softened
- ½ c Light Brown Sugar
- ¾ c Granulated Sugar
- ½ c Creamy Peanut Butter
- ½ c Heavy Whipping Cream
- 1 tsp Vanilla Extract
- 4 Eggs
- 1 ½ c chopped Butterfingers Original Brand Butterfinger
- ½ c Chopped Candied Bacon Bacon cooked with Brown Sugar sprinkled on it
Ganache
- ½ c semi sweet chocolate chips
- ½ c Heavy Cream
- 1 Tbsp Creamy Peanut Butter
Garnish
- ½ c Chopped Butterfingers
- ½ c Chopped Candied Bacon Bacon cooked with Brown Sugar
- ¼ c Drizzled Caramel dessert sauce Homemade or Store Bought- I used Mrs. Richardson’s Caramel dessert sauce
Instructions
- Preheat your oven to 325°F and position the rack in the lower third of the oven. Tightly wrap the outside of a 9-inch springform pan with aluminum foil, then line the bottom with parchment paper and grease the sides.
- For the crust, crush Oreo cookies into fine crumbs using a food processor, then mix with melted butter. Press this mixture into the bottom and about an inch up the sides of the prepared pan. Bake for 8 minutes, then set aside to cool.
- To make the filling, beat cream cheese, brown sugar, granulated sugar, and peanut butter until creamy, using a mixer with the paddle attachment on low speed to avoid incorporating too much air.
- Add eggs one at a time, beating just until combined after each addition – don’t overmix!
- Stir in heavy whipping cream, vanilla extract, chopped Butterfingers, and chopped candied bacon.
- Pour the cheesecake batter into the prepared crust.
- Create a water bath by placing the foil-wrapped springform pan in a larger roasting pan. Add hot water to the roasting pan until it reaches about halfway up the sides of the springform pan.
- Bake for 1 hour and 15 minutes. The cheesecake should be set around the edges but still slightly jiggly in the center.
- Turn off the oven and leave the cheesecake inside for 30 minutes.
- Crack open the oven door and leave the cheesecake for another 30 minutes to cool gradually.
- Remove the cheesecake from the oven, water bath, and foil wrap. Allow it to cool for 5-10 minutes on a cooling rack.
- Refrigerate the cheesecake until firm, at least 5 hours or preferably overnight.
- Once chilled, remove the cheesecake from the springform pan and place on a serving plate.
- For the ganache, place semi-sweet chocolate chips and peanut butter in a bowl. Heat heavy cream until simmering, then pour over the chocolate and peanut butter. Whisk slowly until smooth and let cool for 5-10 minutes.
- Pour the ganache over the top of the chilled cheesecake.
- Garnish with additional chopped Butterfingers, candied bacon pieces, and a drizzle of caramel sauce.
Notes
- Room temperature ingredients – Bring cream cheese and eggs to room temperature before mixing for the smoothest cheesecake batter without lumps.
- Low speed mixing – Use low speed when mixing the cheesecake batter to prevent incorporating too much air, which can cause cracks during baking.
- Proper water bath – Ensure the aluminum foil is tightly wrapped around the springform pan to prevent water from seeping in and making the crust soggy.
- Cooling gradually – The slow cooling process (turning off the oven, then cracking it open) helps prevent the cheesecake from cracking as it cools.
- Chilling time – Don’t rush the refrigeration time – overnight chilling allows the flavors to meld and the texture to set perfectly.
- Clean slicing – Run a sharp knife under hot water and wipe clean between each slice for the cleanest presentation.
Nutrition Information
Hungry for more?
Follow me on Pinterest and make sure to comment below!