
Spooky Halloween Cake Decorating Ideas Anyone Can Master
Looking for creative Halloween cake decorating ideas that will transform your ordinary desserts into spine-tingling masterpieces? With just a few simple techniques and strategic touches, you can create show-stopping treats that will be the hit of any Halloween party or family gathering.
Save This Post!
The best part about these spooky decorating projects is that you don’t need professional skills or expensive equipment to achieve amazing results. Most of these Halloween transformations utilize ingredients you likely already have in your pantry, along with some clever tricks that make decorating both fun and foolproof.
Reasons You’ll Love These Halloween Cake Decorating Ideas
- Budget-friendly decorating – Most techniques use simple ingredients like food coloring, candy, and basic frosting to create dramatic effects without breaking the bank.
- Perfect for all skill levels – From beginner-friendly ghost designs to slightly more advanced graveyard scenes, there’s something here for every decorator.
- Kid-friendly projects – These decorating ideas are perfect for getting children involved in Halloween prep, with many techniques simple enough for little hands to master.
- Impressive results with minimal effort – Even the simplest decorating tricks create treats that look like they came from a professional bakery, making you the hero of Halloween.
Essential Color Schemes for Spooky Success
The foundation of great Halloween cake decorating ideas starts with mastering the classic color palette. Orange, black, purple, and green are your go-to colors for creating that perfect Halloween atmosphere. You can achieve vibrant orange frosting naturally using ingredients you might already have, or invest in gel food coloring for more intense hues.
These Orange Soda Creamsicle Cupcakes demonstrate how beautiful orange frosting can look, and the technique translates perfectly to Halloween themes. For deep black frosting, start with chocolate buttercream and add black food coloring – this prevents the bitter taste that can come from coloring vanilla frosting black.

Simple Ghost and Spirit Designs
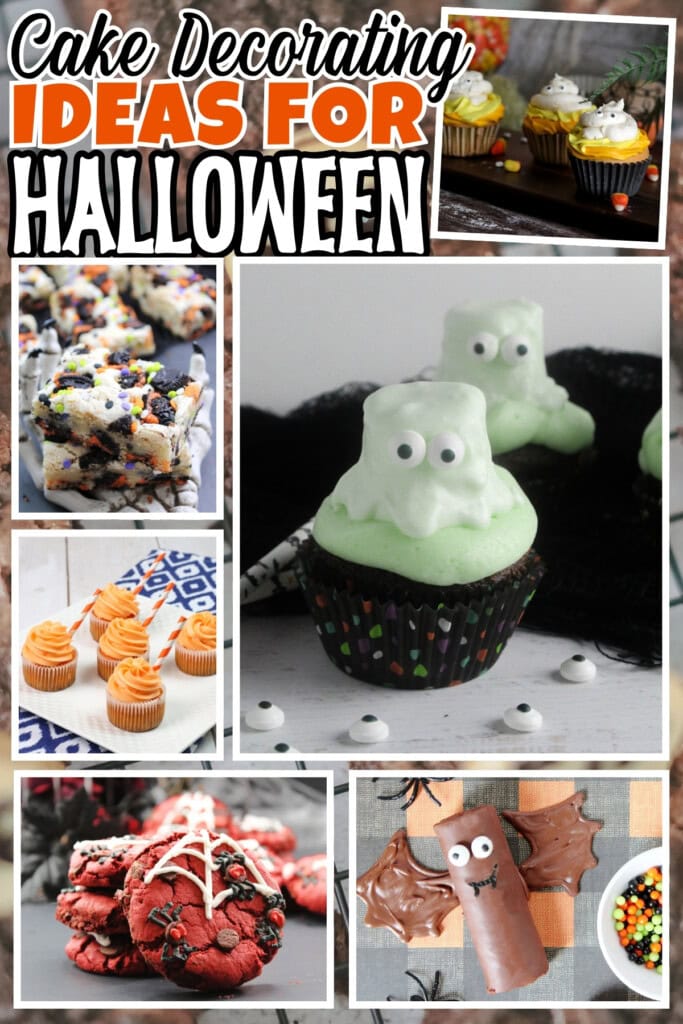
Ghost decorations are the perfect starting point for Halloween cake decorating because they’re forgiving and always adorable. The key is creating smooth, flowing lines that mimic the appearance of draped fabric. These Easy 5 Ingredient Ghost Halloween Cupcakes show just how simple it can be to develop charming ghost designs using basic white frosting and mini chocolate chips.
For larger cakes, you can create ghost shapes by piping white buttercream in overlapping circles, then using a small offset spatula to blend and smooth the edges. The flowing, organic shape of ghosts means small imperfections actually add to the charm rather than detract from the overall design.
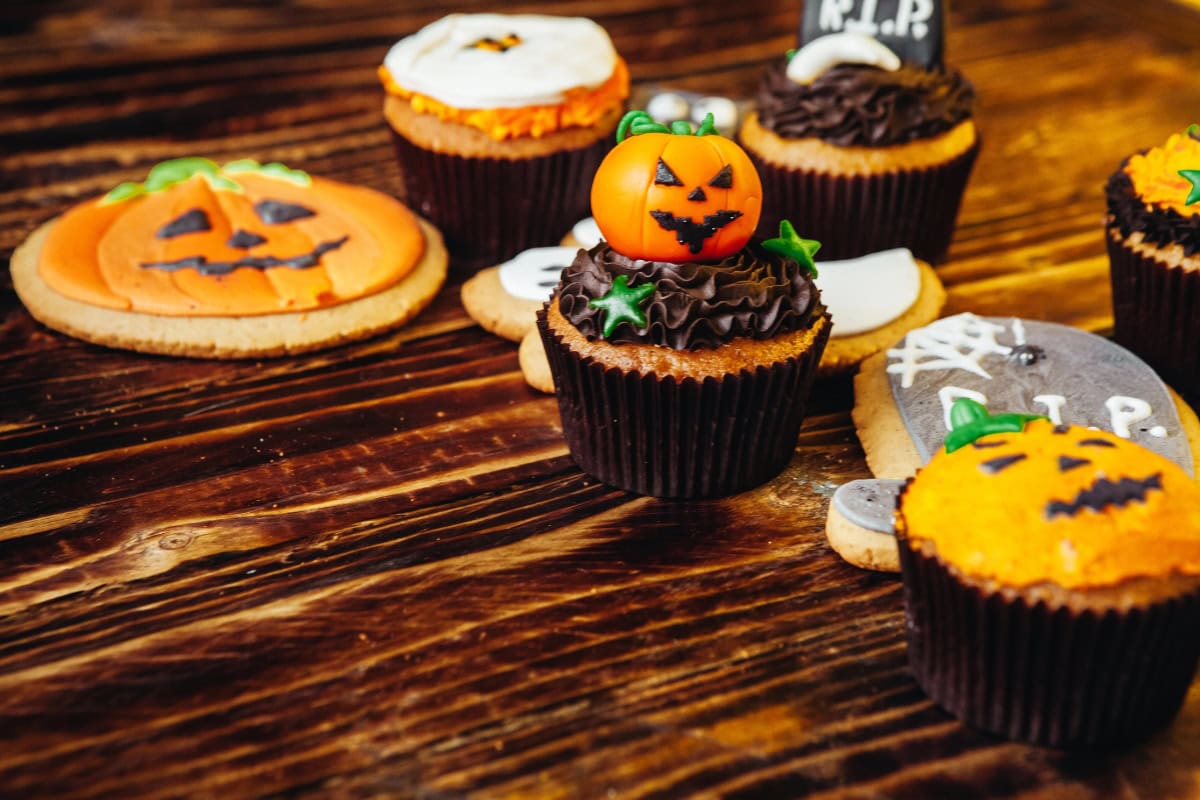
Jack-O’-Lantern Masterpieces
Pumpkin-themed decorations are Halloween classics that never go out of style. The secret to perfect jack-o’-lantern designs lies in getting that rich, deep orange color and creating clean, defined facial features. These 3 Ingredient Jack-O-Lantern Cupcakes prove you don’t need complicated techniques to create recognizable pumpkin faces.

For full-size cakes, consider using the same orange frosting techniques but scaling up the facial features. You can pipe the stem using green frosting or even use a real cinnamon stick for added texture and authenticity.
Creative Witch Hat Transformations
Witch hat decorations add height and drama to your Halloween dessert table. The trick is to create that distinctive pointed cone shape while ensuring everything remains structurally sound. These Sugar Ice Cream Cone Witch Hat Cupcakes showcase how everyday ice cream cones become magical when dipped in chocolate and strategically placed.
The chocolate-dipping technique works for various cone sizes, and you can customize the look by using different types of chocolate or adding sprinkles before the chocolate sets completely.

Spooky Spider and Bat Creations
Eight-legged decorations might sound challenging, but spider designs are surprisingly straightforward once you know the technique. These Easy Red Velvet Halloween Spider Cookies demonstrate how chocolate chips and pretzel pieces can be used to create convincing spider bodies and legs.
For bat designs, these Miniature Reese’s Oreo Bats show how splitting Oreo cookies creates perfect wing shapes. The same technique works beautifully on top of cakes – simply press the cookie halves into frosting at slight angles to create flying bat silhouettes.

Graveyard Scene Techniques
Creating edible graveyard scenes lets you tell a spooky story with your cake decorating. The key elements include textured “dirt” (usually crushed chocolate cookies), tombstone cookies, and strategic lighting effects with darker frosting. These RIP Graveyard Brownies demonstrate how to build layers of texture that create convincing cemetery scenes.
Start with a base layer of chocolate frosting, then add crushed Oreos or chocolate graham crackers for a freshly dug dirt texture. Milano cookies work perfectly as tombstones when you pipe “RIP” or spooky messages with black gel icing.
Candy Corn Color Techniques
The distinctive tri-color pattern of candy corn creates a striking visual impact on Halloween desserts. These Candy Corn Cupcakes show how to layer yellow, orange, and white frosting to recreate this iconic Halloween candy pattern.
The secret is working with slightly warmed frosting for smooth piping and using a large round tip to create clean color divisions. You can apply this same layering technique to full-size cakes by creating horizontal bands of color.
Advanced Assembly Projects
Once you’ve mastered basic decorating techniques, try more complex assembly projects that combine multiple elements. This No-Bake Halloween Treat: Chocolate Swiss Roll Bat Cake demonstrates how existing cake shapes can be transformed through creative cutting and strategic placement of decorations.

The key to successful assembly projects is planning your cuts and decorations before you start, ensuring all pieces fit together properly and that structural elements can support any added weight.
Professional-Looking Finishing Touches
Small details make the biggest difference in Halloween cake decorating. Consider adding edible glitter for supernatural sparkle, or use a fine-mist spray bottle with food coloring to create atmospheric effects. These Halloween Oreo Cake Bars show how incorporating popular candies and cookies creates instant recognition and appeal.
Texture plays a huge role in professional-looking results. Use different piping tips to create various textures – star tips for spiky witch hair, round tips for smooth ghost shapes, and leaf tips for organic, flowing elements.
Storing Your Halloween Masterpieces
- Storage: Keep decorated cakes covered loosely with plastic wrap or in cake carriers to protect decorations while maintaining moisture.
- Refrigerator: Most frosted Halloween cakes can be stored in the fridge for 2-3 days. Remove 30 minutes before serving to allow frosting to soften slightly.
- Freezing: Unfrosted cake layers freeze beautifully for up to 3 months. However, avoid freezing completed, decorated cakes, as decorative elements may lose their shape or color.
- Room Temperature: Cakes with buttercream decorations can be stored at room temperature for up to 24 hours in cool weather, making them ideal for Halloween parties.
Serving Suggestions
These Halloween-decorated treats pair beautifully with themed beverages and complementary desserts. Consider serving these Halloween Cake Pops alongside a complete dessert spread, or add some No-Bake Cheesecake Pumpkin Truffles for variety in texture and flavor.
For drinks, consider pairing them with autumn-themed beverages or creating a full Halloween party spread that includes other spooky treats from the Halloween recipe collection. The key is balancing different textures, flavors, and visual elements to create an impressive Halloween dessert table that guests will remember long after the holiday ends.
FAQs
Ghost cupcakes are perfect for beginners because the flowing, organic shapes are very forgiving. Simple white frosting piped in overlapping circles with mini chocolate chip eyes creates adorable results every time, and small imperfections actually add to the charm.
Most ideas can be completed 1-2 days ahead of your event. Buttercream decorations hold their shape well when stored properly, though avoid decorations with fresh fruit or cream fillings for advance preparation.
Gel food coloring produces the most vibrant results for Halloween cake decorating ideas without thinning your frosting. Orange, black, purple, and green gel colors give you the classic Halloween palette, and a little goes a long way compared to liquid food coloring.
Absolutely! Store-bought frosting works well for most Halloween decorating, though you may want to add a bit of powdered sugar to stiffen it slightly for better piping consistency. Gel food coloring mixes easily into store-bought frosting for custom colors.
The key to smooth frosting is temperature – slightly warm frosting spreads more easily, while cooled frosting holds decorative shapes better. Use an offset spatula for smooth surfaces and invest in a few basic piping tips for clean, professional-looking details in your Halloween cake decorating projects.