
Fun DIY Peppermint Hot Chocolate Bomb Recipe


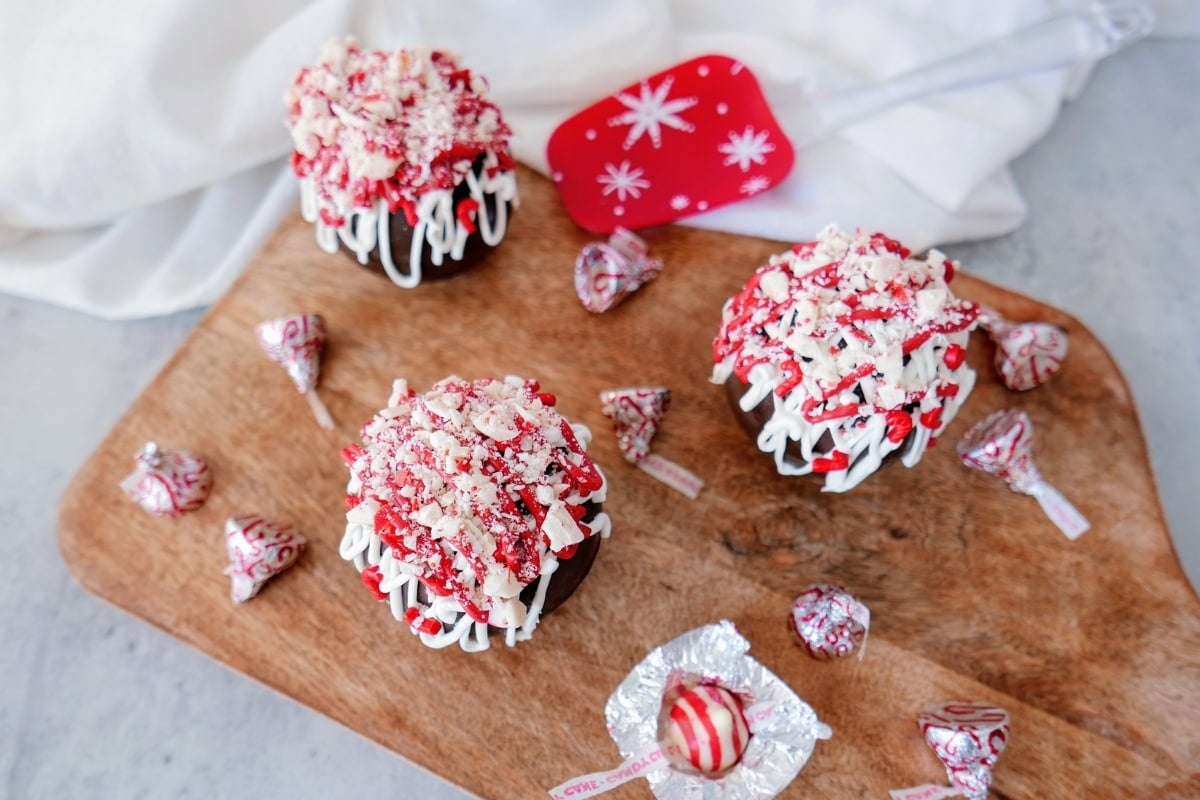
Peppermint Hot Cocoa Bombs are the perfect winter treat! This hot chocolate bomb recipe is made with peppermint extract, hot cocoa mix, and mini marshmallows; they’re so delicious and festive and make a great gift.

Save This Post!
If you are looking for a minty mug of hot cocoa, then this peppermint hot chocolate bomb recipe is just what you need to make ASAP. These little treats are easy to make, and they taste amazing. They will be perfect for any occasion or get-together during the winter season.
What Is Hot Chocolate Bombs?
Hot Chocolate Bombs are a delightful winter novelty that has recently gained considerable popularity. They are essentially a decadent chocolate shell filled with rich hot cocoa powder and marshmallows.
When hot milk is poured over these bombs, they burst open, releasing the cocoa mix and marshmallows, which then blend with the milk to create a creamy, flavorful hot chocolate drink. It’s not just the taste that’s appealing but also the dramatic transformation that’s truly captivating.
It’s a drink and entertainment rolled into one, making a delicious cup of hot chocolate in a fun and unique way to enjoy your favorite beverage.
Why You Should Make This Peppermint Cocoa Bombs Recipe
- Easy to Make – These peppermint cocoa bombs are really easy to make and only require a few simple ingredients.
- Great for Parties – These bombs would be perfect for any winter party or get-together. They are festive and delicious!
- Kid-friendly – These bombs are perfect for kids. They are easy to make, and they taste great.
If you love recipes like this, you may also enjoy this Gingerbread Hot Cocoa Bomb and DIY Hot Chocolate Spoons recipe.
Ingredients For Hot Chocolate Bomb Recipes

- Dark Chocolate Bars: I opted for bars with 72% cocoa, but feel free to use any dark chocolate of your choice. The key is to ensure it contains cocoa butter for a smoother, richer taste.
- Hershey’s Candy Cane Kisses: These add a festive hint of peppermint to the mix, complementing the rich chocolate nicely.
- Hot Cocoa Mix: This serves as the base of your hot chocolate bomb, providing that classic, comforting, delicious cup of hot cocoa flavor we all know and love.
- Miniature Marshmallows: These tiny, fluffy additions offer a delightful surprise when the bomb melts, adding a sweet and creamy texture.
- White Candy Melts: These melts serve a dual purpose, adding a contrasting sweet flavor to the dark chocolate and acting as the glue that holds your bomb together.
- Candy Cane Sprinkles: These crushed candy canes will add a festive pop of color and a slight crunch, enhancing both the visual appeal and texture of your hot chocolate bomb.
- Red Candy Melts: These provide a vibrant, festive hue and an additional layer of sweetness, perfect for people who enjoy extra sweetness in their hot chocolate.
Substitutions And Variations
- Chocolate – You can switch up the chocolate for milk chocolate, semi-sweet chocolate, or white chocolate. If you want a stronger peppermint flavor, add a little peppermint flavoring to the melted chocolate.
- Mints – You can substitute the chopped Hershey Kisses for crushed peppermints, Andes Peppermint Crunch Baking Chips, or just use peppermint flavoring.
- Marshmallows – Not a fan of marshmallows? Then leave them out of this holiday hot chocolate bombs recipe.
See the recipe card below for the full list of ingredients and exact measurements.
How To Make Peppermint Hot Cocoa Bombs

- Start by breaking one chocolate bar into small pieces, and place it in a microwave-safe bowl.
- Microwave for 30 seconds at 50% power. Stir, and then return it to the microwave, heat in 15-second intervals, and then stir again. (Photo 1)
- Once it begins to look melted with a few chunks of chocolate left, insert your candy thermometer into the chocolate. (Photo 2)
- You want your dark chocolate to be no higher than 90℉, or the chocolate will be untempered and will have a chalky appearance with possible streaks of white.
- Once you reach your desired temperature, continue stirring until all chocolate is smooth and creamy with no lumps. (Photo 3)
- Place the silicone mold on a tray or flat baking sheet, and spoon approximately a tbsp of the melted dark chocolate into the molds. (Photo 4)
- Thoroughly coat the inside of the molds with a small silicone spatula, pastry brush, or the back of a spoon.
- Make sure to make the edges a little thicker so that they don’t break when melding together. If the chocolate is pooled at the bottom, spread again to coat all sides evenly, or your sphere will be less circular, and more flat on the bottoms from the pooled chocolate.

- Cool in the refrigerator for 1-2 minutes to set, and then remove. Heat the remaining chocolate per step 1, and repeat this process again to make a second layer of dark chocolate, again paying special attention to the edges. (Photo 5)
- Place back in the refrigerator for another 2 minutes.
- While the chocolate is setting, roughly chop approximately 15 candy cane Hershey Kisses. (Photo 6)
- Remove the chocolate from the refrigerator, and slowly pull the mold away from the chocolate, pushing it up from the bottom to release it. (Photo 7)
- Heat a small plate in the microwave for 15-20 seconds. Place half spheres open-side down on the plate and lightly twist to melt the edges. (Photo 8)

- Immediately fill with a couple of heaping tablespoons of hot cocoa mix, approximately 10 miniature marshmallows, and a tsp or more of chopped Hershey Kisses. (Photo 9)
- Place another chocolate sphere on the plate, melt the edges, and place it on top of the filled half to make a chocolate ball. (Photo 10)

- Next, melt the white candy melts per package instructions. Drape a sandwich bag or pastry bag over your hand, and fill it with the melted candy. (Photos 11 & 12)
- Cut the tip with kitchen shears, and pipe back and forth over the chocolate bomb. Add candy cane sprinkles. (Photos 13 & 14)

- Melt the red candy melts per package instructions, and repeat step 5 to fill a sandwich bag/pastry bag. (Photos 15 & 16)
- Cut the tip, pipe over the white candy melts, and sprinkle the chopped Hershey Kisses on top. (Photo 17)
- Repeat with the remaining cocoa bombs. (Photo 18)
- When you’re ready to enjoy your cocoa bomb, heat a mug of hot milk, place a cocoa bomb in a mug, pour the warm milk over it, and watch the hot cocoa mix and marshmallows explode in the milk!
Expert Tips
- Use gloves to prevent the residual heat from your fingers from melting the chocolate while you are working.
- Be sure not to overfill the chocolate mold, or they will be difficult to remove and could break.
- You can also use a toothpick to help release the bombs from the mold if needed.
- You can switch up the chocolate for milk or white chocolate. If you want a stronger peppermint flavor, add a little peppermint flavoring as the perfect addition to the melted chocolates.
- You can substitute the chopped Hershey Kisses for crushed peppermints, Andes Peppermint Crunch Baking Chips, or just use peppermint flavoring.
Storing Tips
For the best results, store your hot cocoa bombs in an airtight container at room temperature for up to two weeks or in the fridge for up to one month. These bombs are very delicate, so handle them with care!
These hot cocoa bombs can be frozen for up to six months. Just be sure to prevent them from being crushed in your freezer.
You can make these in advance. If stored properly in an airtight container, they should stay fresh for up to two weeks at room temperature or one month in the fridge. You can also freeze them for up to six months.
What To Serve With Peppermint Hot Chocolate Bomb Recipe
Hot Chocolate Bombs are a delicious treat on their own, but they can also be paired with a variety of other desserts and snacks to make your indulgence even more special. Here are some suggestions:
- Cookies: Pair your delicious hot chocolate bomb with your favorite cookies. The classic combination of cookies and hot chocolate is a comfort food staple that never goes out of style.
- Marshmallow Skewers: Add some marshmallow skewers on the side for an extra touch of fun and sweetness.
- Whipped Cream: Serve your hot chocolate with a dollop of whipped cream on top. The creaminess of the whipped cream complements the rich chocolate flavor perfectly.
- Cinnamon Sticks: Add a couple of cinnamon sticks to your cup of hot chocolate for a hint of spice and warmth.
- Pastries: Pastries such as croissants or danishes also pair wonderfully with hot chocolate, making for a fulfilling and decadent treat.
- Fruit: If you want to add a healthier element to your snack, pairing your hot chocolate with some fresh fruit can provide a refreshing contrast to the rich chocolate flavor.
Remember, there’s no wrong way to enjoy a hot chocolate bomb – experiment with different combinations to find your perfect pairing!

Peppermint Hot Chocolate Bombs Recipe FAQs
Yes, you can use different shapes of silicone molds, but it’s important to remember that the fillings need to be contained inside, so the mold has to be a closed shape, like a sphere or a cube.
Any brand of hot chocolate mix will work well in these bombs. If you have a particular favorite brand, feel free to use it.
Absolutely! This recipe uses dark chocolate for the spheres, but you can also use milk chocolate, white chocolate, or any flavored chocolate you prefer. Just ensure it melts well.
Yes, simply use dairy-free chocolate for the bomb and a dairy-free hot cocoa mix for the filling.
Of course, feel free to get creative with your fillings! You could add cinnamon, nutmeg, crushed cookies, flavored coffee creamer powder, or even a mini liqueur bottle for an adult treat.


Fun DIY Peppermint Hot Chocolate Bomb Recipe
Ingredients
- 5.5 ounces dark chocolate bars I used 72% cocoa. You can use any dark chocolate, just make sure it contains cocoa butter
- 12 Hershey’s Candy Cane Kisses
- 9 tbsp Hot Cocoa Mix
- ½ cup Miniature marshmallows
- ½ cup white candy melts
- ¼ cup Candy cane sprinkles
- ½ cup red candy melts
Instructions
- Start by breaking one chocolate bar into small pieces, and place in a glass bowl.
- Microwave for 30 seconds at 50% power. Stir, and then return it to the microwave, heat another 15 seconds, and then stir again.
- Once it begins to look melted with a few chunks of chocolate left, insert your candy thermometer into the chocolate.
- You want your dark chocolate to be no higher than 90℉, or the chocolate will be untempered and will have a chalky appearance with possible streaks of white.
- Once you reach your desired temperature, continue stirring until all chocolate is smooth and creamy with no lumps.
- Place the silicone mold on a tray or flat baking sheet, and spoon approximately a tbsp of the melted dark chocolate into the molds.
- Thoroughly coat the inside of the molds with a small silicone spatula or the back of a spoon.
- Make sure to make the edges a little thicker, so that they don’t break when melding together. If the chocolate is pooled at the bottom, spread again to evenly coat all sides, or your sphere will be less circular, and more flat on the bottoms from the pooled chocolate.
- Cool in the refrigerator for 1-2 minutes to set, and then remove. Heat the remaining chocolate per step 1, and repeat this process again to make a second layer of dark chocolate, again paying special attention to the edges.
- Place back in the refrigerator for another 2 minutes.
- While the chocolate is setting, roughly chop approximately 15 candy cane Hershey Kisses.
- Remove the chocolate from the refrigerator, and slowly pull the mold away from the chocolate, pushing up from the bottom to release.
- Heat a small plate in the microwave for 15-20 seconds. Place a sphere open side down on the plate, and lightly twist to melt the edges.
- Immediately fill with a couple of heaping tablespoons of hot cocoa mix, approximately 10 miniature marshmallows, and a tsp or more of chopped Hershey Kisses.
- Place another chocolate sphere on the plate, and melt the edges, and place it on top of the filled sphere.
- Next, melt the white candy melts per package instructions. Drape a sandwich bag or pastry bag over your hand, and fill it with the melted candy.
- Cut the tip with kitchen shears, and pipe back and forth over the chocolate bomb. Add candy cane sprinkles.
- Melt the red candy melts per package instructions, and repeat step 5 to fill a sandwich bag/pastry bag.
- Cut the tip, and pipe over the white candy melts, and sprinkle the chopped Hershey Kisses on top.
- Repeat with the remaining cocoa bombs.
- When you’re ready to enjoy your cocoa bomb, heat the milk of your choice, place a cocoa bomb in a mug, and pour the milk over it and watch the hot cocoa mix and marshmallows explode in the milk!
Notes
-
- Use gloves to prevent the residual heat from your fingers from melting the chocolate while you are working.
- Be sure not to overfill the chocolate mold, or they will be difficult to remove and could break.
-
- You can also use a toothpick to help release the bombs from the mold if needed.
-
- You can switch up the chocolate for milk or white chocolate. If you want a stronger peppermint flavor, add a little peppermint flavoring as the perfect addition to the melted chocolates.
-
- You can substitute the chopped Hershey Kisses for crushed peppermints, Andes Peppermint Crunch Baking Chips, or just use peppermint flavoring.
Nutrition Information
Hungry for more?
Follow me on Pinterest and make sure to comment below!
These Peppermint hot cocoa bombs are adorable! I love the flavor and I can’t get over the decoration on them. I can’t wait to make these.
They are so fun to make and they make great gifts, too!
Oh, this is so fun!! Such a festive treat! It would be a great gift idea, too!
These are super cute, and they sound delicious. I think I’m going to make a few batches of these and give them to friends as gifts!
They make the perfect gift! I always stick them in the adult’s stockings, too!