
Chocolate Covered Oreos (How To Make For Easter)

These Easter chocolate-covered Oreos are a festive, easy dessert that requires no baking. Decorated Oreos to look like baby chicks and colorful Easter eggs. These chocolate-dipped Oreos are decorated with festive colors to scream Easter fun with each bite.

These Easter Oreos look great on a plate for your dessert table. Or place them in clear plastic bags for gifting loved ones.
If you are looking for more easy desserts, try this Cocoa Rice Krispies nest topped with candy eggs. For a sliceable recipe, try my M&M Easter bars.
Table of Contents
What Are Easter Chocolate Dipped Oreos?
Easter chocolate-dipped Oreos are Oreo sandwich cookies dipped in colored chocolate coating and decorated. I will show you how to make cookies decorated with Easter eggs and Easter chicks to mimic a baby chick! They are a fun and festive dipped Oreo recipe.
Why You’ll Love This Recipe
These Easter Oreos are incredibly fun to make and delicious. Here are a few reasons why you might fall in love with them.
- The Easter egg and baby chicken design are so festive and fun. They make the perfect party favors or Easter treat.
- No baking is required. I love quick and easy no-bake desserts.
- You don’t have to be a pro decorator to make these decorated cookies. I share how to simply decorate, and you can use your imagination to create your looks.
- Any flavor of Oreo can be used for dipping! From a sweet lemon to a peanut butter or mint cookie.
Ingredients For Chocolate Covered Oreos

- Oreo Cookies – You can use any flavor of Oreo for this recipe. From a classic Oreo to a double stuffed or a flavored cookie. From peanut butter, mint, or reach for a holiday-flavored Oreo.
- Chocolate – I do recommend using good quality chocolate for this recipe. I prefer to use Ghirardelli melting wafers, but you can use other types of chocolate or chocolate melts. The chocolate is the stand-out flavor, so if it doesn’t taste good, it will affect the flavor of the cookies.
- Food Coloring – You need to buy oil-based food coloring. This will allow you to color the white chocolate without causing it to seize up. Now, if you don’t want to buy food coloring, you can buy colored candy melts that are already pre-colored for the recipe.
- Sprinkles – Pearl black sprinkles will be used for the yes; orange heart sprinkles for the beak and feet, and then jimmies for the chick’s hair, and colorful sprinkles for decorating the Easter eggs.
- M&M cut in half for the wings. Feel free to change up the types of sprinkles if you find something that is a good substitute.
Substitutions and Variations
If you’d like to experiment with different flavors or have dietary restrictions, here are some variations and substitutions you can consider:
- Oreos: If you’re looking for a gluten-free variant, numerous brands offer gluten-free sandwich cookies that can be used as a substitute. For a healthier option, consider a whole-grain sandwich cookie.
- Chocolate: If you’re vegan or lactose intolerant, you can opt for vegan chocolate or dark chocolate. For those who prefer a milder flavor, milk chocolate or white chocolate could work too.
- Food Coloring: Natural food coloring can be a great alternative to artificial coloring. Beetroot juice, spinach extract, or turmeric can lend beautiful colors to chocolate.
- Sprinkles: Feel free to use any variety of sprinkles that you prefer. You can even make your own sugar-free sprinkles at home.
- M&Ms: If you’re not a fan of M&Ms or have nut allergies, consider using candy-coated chocolates or licorice pieces for the wings.
Remember, baking is all about creativity and having fun. Feel free to make this recipe your own!
See the recipe card below for a complete list of ingredients and measurements.
How To Make Chocolate Covered Oreos

- Line a large baking tray with parchment paper. Set aside.
- On low heat, melt 1 cup of Ghirardelli vanilla melting wafers using a double boiler. Stir until smooth to ensure a smooth finish. Alternatively, use a microwave-safe bowl and heat in 30-second intervals, stirring after each.
- Add yellow food coloring to the melted wafers. Stir until the color is even. Adjust food coloring to get the right shade. (Photo 1)
- Dip an Oreo cookie into the yellow melts using a fork. Remove excess coating. (Photo 2)
- Put the cookie on the baking sheet. Repeat for 3 more Oreos. Work fast to prevent the coating from setting. (Photo 3)
- Make chick faces on the Oreos. Use two eyes, an orange heart for the beak, two orange hearts for feet, orange jimmies for hair, and half a yellow M&M on each side for wings. Repeat with 4 more Oreos. (Photo 4)

- Clean the double boiler. Melt 1 cup of vanilla melting wafers. Stir until smooth. Add pink and purple food coloring.
- Dip 8 Oreos, 4 in each color, in the melted chocolate wafers. Remove excess chocolate coating. (Photos 5, 6, 7 & 8)
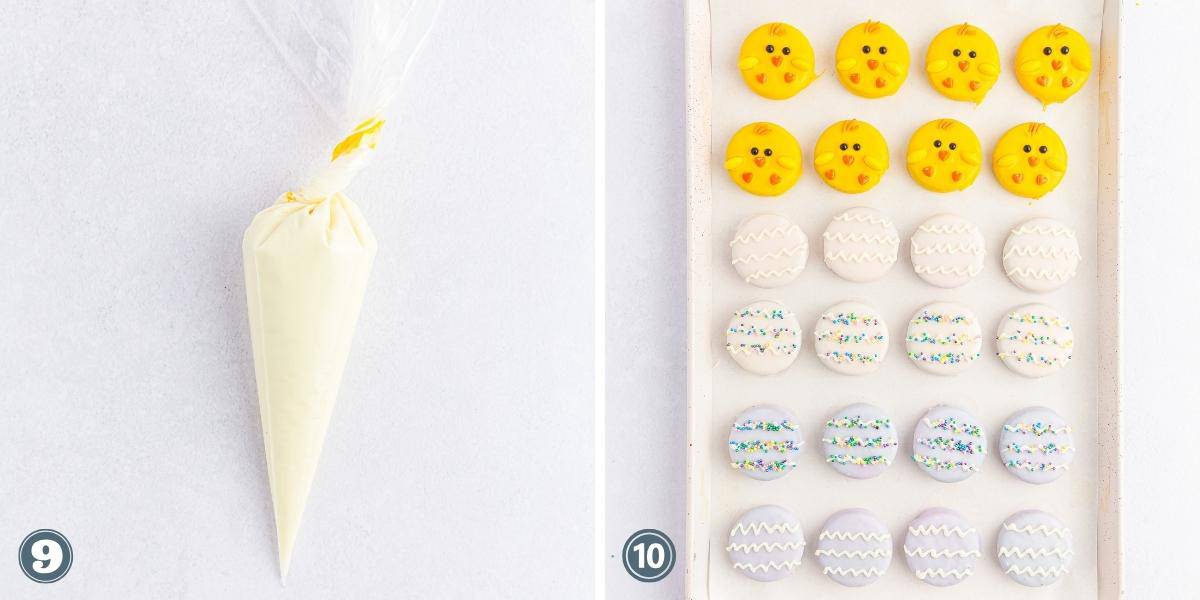
- Place the coated cookies on the baking tray. Melt ½ cup of vanilla wafers in a microwave-safe piping bag in 30-second intervals until fully melted. (Photo 9)
- Cut a small opening at the tip of the bag. Drizzle the melted wafers on the pink and purple Oreos. Add sprinkles if desired. (Photo 10)
- Refrigerate the baking tray for 10-15 minutes so the coating sets. Serve after.

Expert Tips
- High-quality chocolate enhances the flavor, but cheaper chocolate won’t melt as smoothly, resulting in a lumpy-looking chocolate.
- You can not add regular food coloring to chocolate. It needs to be an oil-based food coloring, or it will seize the chocolate and ruin it.
- Any cookie flavor works; the key is a sandwich cookie, so you can place the fork in the filling for easy dipping.
- You do need to work fast, as candy melt-style chocolate sets up pretty quickly. So make sure that you have all your ingredients set out and ready to decorate with.
- For the best result, melt the chocolate in a double boiler or heat it in the microwave.
- Allow the cookies to fully set up before you store them. If you stack cookies, placing wax paper between layers will help ensure the design doesn’t get messed up.
How Do You Melt Candy Melts In The Microwave
So if you are looking for a quick and easy way to melt candy melts, here is my go-to for the microwave method if you don’t own a double boiler.
Simply place the chocolate in a microwave-safe bowl. Then place in microwave and heat for 30 seconds.
Remove and stir the warm chocolate. Repeat the 30-second heat cycles, stirring between each heat cycle. Once the chocolate is melted, you are ready for dipping.
Note: If you overheat the chocolate, it will become super thick and not mix well. It is important to mix between each heat cycle. You can add 1/2 teaspoon of shortening to chocolate to help thin it up if you find it is too thick.
Storing Tips
This chocolate-covered oreos recipe can easily be stored in a sealed, airtight container on the counter at room temperature. Alternatively, you can store them in the fridge if your home is too warm and you run the risk of melting the chocolate.
These delicious treats can be stored for 1-2 weeks easily. You will find the cookies will go stale when they need to be tossed out.
Freezing
Or to extend the shelf life, go right ahead and freeze any cookies. Just place wax paper between the stacking layers and freeze for up to 6 months. Then thaw on the counter or in the fridge and enjoy.
More Easy Desserts To Pair With Oreo Cookies
Are you looking to create more easy sweet treats to fill a dessert table for a crowd? Here are a few more of my go-to desserts.
This Oreo fluff dip is a great one you can have next to the Oreo cookies. It creates a fun Oreo theme. Now you could also consider pairing it with this thumbprint cookie recipe that is colorful and fits the Easter theme.

Recipe FAQs
Yes, you can make these up to 2 days in advance of when you want to serve them up. For the freshness, I wouldn’t go over 2 days. Just store in a sealed container until you are ready for serving.
If your melted chocolate begins to harden, simply place the bowl back in the microwave to reheat it. Alternatively, if you used a double boiler, place it back on the stovetop to reheat the chocolate and melt it down again.
There is no specific type of Oreo required for this recipe. As long as it’s a sandwich cookie, any flavor or variety of Oreos will work.
Yes, you can certainly use other types of sandwich cookies for this recipe. Just ensure that the filling is sufficient for the fork to hold onto during the dipping process.
Apply your decorations while the chocolate is still wet. This allows them to stick properly. If the chocolate has already set, the decorations may not stick well and could fall off.
Need More Recipes? Try These:
- Easy Ambrosia Salad Recipe
- Easy Deviled Egg Pasta Salad
- How to Make A Double Pie Crust
- Easter Chocolate Covered Oreos Chicks and Eggs
- Quick And Easy Oreo Fluff Dip
- Easy Cocoa Rice Krispie Easter Egg Nests
- Easter Rice Krispie Treats (Quick and Easy Recipe)
- Boozy Easter Egg Jello Shots
- Easter Thumbprint Cookies
- Easy Easter M&M Bars – Soft and Chewy Cookie Bar Recipe
- Homemade Funfetti Sheet Cake
Kid-Friendly Recipes
- Easy Cheeseburger Sliders
- Unicorn Cheesecake on a Stick
- Easy Gatorade Slushie
- Mini Waffle Skewers
- Lunchbox Mini Pizzas
- 3 Ingredient Homemade Hot Pockets
- Turkey Bacon Club Lunch Kabobs
- PB&J with Banana “Sushi“
Dessert Recipes
- Chocolate Chip Whoopie Pies
- Homemade Funfetti Sheet Cake
- Caramel Cheesecake Brownies
- The Best Double-Crusted Apple Pie Recipe
- Fruit Roll-Up Ice Cream Sandwiches
- Reeses Peanut Butter Cup Cookie Bars
- Cool Whip Candy
- Dessert Burger Whoopie Pies
- Maw Maw’s Southern peach cobbler with canned peaches
- Easy Blueberry Dump Cake
- French Chocolate Mousse Silk “Pie” Brownies
- Kit Kat Fudge
- See all our yummy dessert recipes!
Or any other delicious recipes on my site? If so, please leave a ★★★★★ star rating below and a 📝 comment sharing your thoughts!
To ensure you’re not missing a thing. Subscribe to my newsletter and follow along below!

Chocolate Covered Oreos (How to Make for Easter)
Equipment
- Double Boiler optional
- Microwave-Safe Bowl optional
Ingredients
- 24 Oreo cookies
- 3 10 oz (368 ½ g) bags Ghirardelli vanilla melting wafers
- Oil based food coloring in yellow pink, and purple
- Small black sugar pearl sprinkles for the chick’s eyes
- Small orange heart sprinkles for the chick’s beak and feet
- Orange jimmies sprinkles for the chick’s hair
- Yellow M&M’s cut in half for the chick’s wings
- Nonpareil sprinkles for the eggs
Instructions
- Line a large baking tray with parchment paper. Set aside.
- On low heat, melt 1 cup of Ghirardelli vanilla melting wafers using a double boiler. Stir until smooth to ensure a smooth finish. Alternatively, use a microwave-safe bowl and heat in 30-second intervals, stirring after each.3 10 oz bags Ghirardelli vanilla melting wafers
- Add yellow food coloring to the melted wafers. Stir until the color is even. Adjust food coloring to get the right shade.Oil based food coloring in yellow
- Dip an Oreo cookie into the yellow melts using a fork. Remove excess coating.24 Oreo cookies
- Put the cookie on the baking sheet. Repeat for 3 more Oreos. Work fast to prevent the coating from setting.
- Make chick faces on the Oreos. Use two eyes, an orange heart for the beak, two orange hearts for feet, orange jimmies for hair, and half a yellow M&M on each side for wings. Repeat with 4 more Oreos.Small black sugar pearl sprinkles for the chick’s eyes,Small orange heart sprinkles for the chick’s beak and feet,Orange jimmies sprinkles for the chick’s hair,Yellow M&M’s cut in half for the chick’s wings,Nonpareil sprinkles for the eggs
- Clean the double boiler. Melt 1 cup of vanilla melting wafers. Stir until smooth. Add pink and purple food coloring.
- Dip 8 Oreos, 4 in each color, in the melted chocolate wafers. Remove excess chocolate coating.
- Place the coated cookies on the baking tray. Melt ½ cup of vanilla wafers in a microwave-safe piping bag in 30-second intervals until fully melted.
- Cut a small opening at the tip of the bag. Drizzle the melted wafers on the pink and purple Oreos. Add sprinkles if desired.
- Refrigerate the baking tray for 10-15 minutes so the coating sets. Serve after.
Notes
- High-quality chocolate enhances the flavor, but also cheaper chocolate won’t melt as smoothly, resulting in a lumpy-looking chocolate.
- You can not add regular food coloring to chocolate. It needs to be an oil-based food coloring, or it will seize the chocolate and ruin it.
- Any cookie flavor works; the key is a sandwich cookie, so you can place the fork in the filling for easy dipping.
- You do need to work fast, as candy melt-style chocolate sets up pretty quickly. So make sure that you have all your ingredients set out and ready to decorate with.
- For the best result, melt the chocolate in a double boiler or heat it in the microwave.
- Allow the cookies to fully set up before you store them. If you stack cookies, placing wax paper between layers will help ensure the design doesn’t get messed up.
Nutrition Information
Hungry for more?
Follow me on Pinterest and make sure to comment below!


